Who's Online |
96 user(s) are online ( 42 user(s) are browsing Forums)
Members: 0
Guests: 96
more...
|
|
Headlines |

-
amidisas.tar.bz2 - development/utility
Apr 16, 2024
-
wildmidi.lha - audio/play
Apr 15, 2024
-
liba52.lha - development/library/audio
Apr 14, 2024
-
libcurl.lha - development/library/misc
Apr 14, 2024
-
libopenssl.lha - development/library/misc
Apr 14, 2024
-
bermudasyndrome.lha - game/action
Apr 14, 2024
-
amigagpt.lha - network/chat
Apr 14, 2024
-
curl.lha - network/misc
Apr 14, 2024
-
dgen_sdl.lha - emulation/gamesystem
Apr 12, 2024
-
amiarcadia.lha - emulation/gamesystem
Apr 11, 2024
|
|
|
|
|
Re: List of wanted Software
|
Posted on: 2020/10/28 20:21
#121
|
Just popping in 

|
@Capehill Quote: Ohh YESSS :) @AmigaOldskooler Quote:
Found a game called Linball written using C + SDL libraries. Works on Linux. Would this one be portable you think? Just curious. Thanks in advance for reply.
Here is the link:
https://sourceforge.net/projects/linball/
I have this Game here in my porting dir and it seems* to work 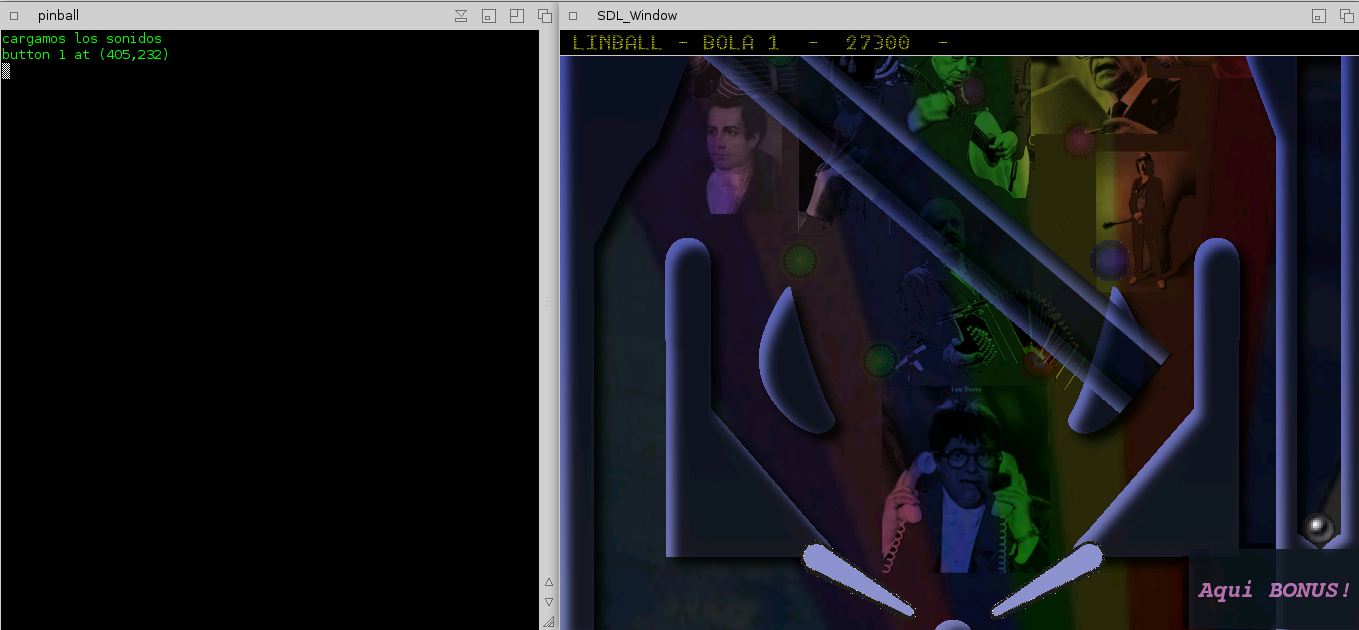 * It's a version from 2010 and i haven't looked at it for about 10 years. So gimmi some time to test. At the moment i cannot say what was wrong 10 years ago... I'll upload soon a beta to a file-service or if everything seems to be ok a version directly to OS4Depot.
Edited by IamSONIC on 2020/10/28 20:54:43
|
|
|
|
|
|
Re: Joystick/gamepad usable for os4
|
Posted on: 2020/10/24 22:59
#122
|
Just popping in
|
@Capehill Quote:
as soon as I touch the right stick, Z-Axis sliders drop from middle to bottom. They never set to middle again even after calibration.
I never experienced this. But i also had initially some problems which i could solve. I tested it successfully with Xbox One S, PS3 and a pair of Nintendo Switch Joycons. -> All Wireless <- You could try the following steps: - When i write "delete" you (or someone else) should know where to obtain the files again or better backup them ;) - Unplug ALL Game Devices - Reboot - Delete the following files from SYS:Libs/AmigaInput - PCI_SoundCardHornet.driver - PCI_Soundcard.driver - PCI_sblive.pci - PCI_GamePortHornet.driver - PCI_GamePort.driver - Delete all Files within SYS:Prefs/Env-Archive/Sys/AmigaInput/ - Reboot - Plug the MAGIC-NS Stick into an USB Port (Don't connect your Gamepad via USB Cable - Bluetooth works perfect!) - The MAGIC-NS Stick has a small Button, select "DINPUT" Mode (should be indicated by a blinking blue LED) - When the MAGIC-NS LED blinks blue it is time to switch your Gamepad on - IMPORTANT NOTE HERE - When you switch your wireless Gamepad on - ENSURE BOTH ANALOG STICKS ARE IN NORMAL POSITION - Click the Button on the MAGIC-NS stick and the "Connect"-Button of your PS4 Pad - If you successfully paired your MAGIC-NS Stick and Controller, the LED of the MAGIC-NS Stick should stop blinking and light constantly in blue - Open AmigaInput, select USB, you should see MAGIC-NS whithin "Drivers" Tab - Select it - DON'T CALIBRATE YOUR GAMEPAD !!! - It should work now perfectly - Test it (only) by moving the sticks and pressing the Buttons - Save
Edited by IamSONIC on 2020/10/24 23:23:17
|
|
|
|
|
|
Re: Joystick/gamepad usable for os4
|
Posted on: 2020/10/22 18:23
#123
|
Just popping in
|
@jabirulo Yes, the right stick works flawlessly. In the debug output the left stick is denoted as "AXIS 0 and AXIS 1" and the right one as "AXIS 2 and AXIS 3".
INFO: Configuring button binding for button 3

INFO: AXIS 0 nValue -7281 nCurrentDistance 0 nFarthestDistance 0

INFO: AXIS 0 nValue -17424 nCurrentDistance 10143 nFarthestDistance 10143

INFO: AXIS 0 nValue -26266 nCurrentDistance 18985 nFarthestDistance 18985

INFO: Configuring axis binding for axis 0 0/-32768 committed = false

INFO: AXIS 0 nValue -32768 nCurrentDistance 25487 nFarthestDistance 25487

INFO: Configuring axis binding for axis 0 0/-32768 committed = false

INFO: AXIS 0 nValue -27306 nCurrentDistance 20025 nFarthestDistance 25487

INFO: Configuring axis binding for axis 0 0/-32768 committed = false

INFO: AXIS 0 nValue 963 nCurrentDistance 8244 nFarthestDistance 25487

INFO: Configuring axis binding for axis 0 0/-32768 committed = true

INFO: AXIS 0 nValue 321 nCurrentDistance 7602 nFarthestDistance 25487

INFO: AXIS 0 nValue 963 nCurrentDistance 8244 nFarthestDistance 8244

INFO: AXIS 0 nValue 2569 nCurrentDistance 9850 nFarthestDistance 9850

INFO: AXIS 0 nValue 3854 nCurrentDistance 11135 nFarthestDistance 11135

INFO: AXIS 0 nValue 4818 nCurrentDistance 12099 nFarthestDistance 12099

INFO: AXIS 0 nValue 5782 nCurrentDistance 13063 nFarthestDistance 13063

INFO: AXIS 0 nValue 8031 nCurrentDistance 15312 nFarthestDistance 15312

INFO: AXIS 0 nValue 9958 nCurrentDistance 17239 nFarthestDistance 17239

INFO: AXIS 0 nValue 22487 nCurrentDistance 29768 nFarthestDistance 29768

INFO: Configuring axis binding for axis 0 0/32767 committed = false

INFO: AXIS 0 nValue 24093 nCurrentDistance 31374 nFarthestDistance 31374

INFO: Configuring axis binding for axis 0 0/32767 committed = false

INFO: AXIS 0 nValue 32767 nCurrentDistance 40048 nFarthestDistance 40048

INFO: Configuring axis binding for axis 0 0/32767 committed = false

INFO: AXIS 1 nValue 321 nCurrentDistance 0 nFarthestDistance 0

INFO: AXIS 1 nValue 3854 nCurrentDistance 3533 nFarthestDistance 3533

INFO: AXIS 1 nValue 5139 nCurrentDistance 4818 nFarthestDistance 4818

INFO: AXIS 0 nValue 19274 nCurrentDistance 26555 nFarthestDistance 40048

INFO: Configuring axis binding for axis 0 0/32767 committed = false

INFO: AXIS 0 nValue 1284 nCurrentDistance 8565 nFarthestDistance 40048

INFO: Configuring axis binding for axis 0 0/32767 committed = true

INFO: AXIS 1 nValue 0 nCurrentDistance 321 nFarthestDistance 4818

INFO: AXIS 0 nValue 321 nCurrentDistance 7602 nFarthestDistance 40048

INFO: AXIS 1 nValue -10103 nCurrentDistance 10424 nFarthestDistance 10424

INFO: AXIS 1 nValue -22391 nCurrentDistance 22712 nFarthestDistance 22712

INFO: Configuring axis binding for axis 1 0/-32768 committed = false

INFO: AXIS 0 nValue 3212 nCurrentDistance 10493 nFarthestDistance 10493

INFO: AXIS 1 nValue -32768 nCurrentDistance 33089 nFarthestDistance 33089

INFO: Configuring axis binding for axis 1 0/-32768 committed = false

INFO: AXIS 0 nValue 5139 nCurrentDistance 12420 nFarthestDistance 12420

INFO: AXIS 0 nValue 6746 nCurrentDistance 14027 nFarthestDistance 14027

INFO: AXIS 0 nValue 7709 nCurrentDistance 14990 nFarthestDistance 14990

INFO: AXIS 1 nValue -11741 nCurrentDistance 12062 nFarthestDistance 33089

INFO: Configuring axis binding for axis 1 0/-32768 committed = false

INFO: AXIS 0 nValue 321 nCurrentDistance 7602 nFarthestDistance 14990

INFO: AXIS 1 nValue 0 nCurrentDistance 321 nFarthestDistance 33089

INFO: Configuring axis binding for axis 1 0/-32768 committed = true

INFO: AXIS 1 nValue 13171 nCurrentDistance 12850 nFarthestDistance 12850

INFO: AXIS 1 nValue 14456 nCurrentDistance 14135 nFarthestDistance 14135

INFO: AXIS 1 nValue 32767 nCurrentDistance 32446 nFarthestDistance 32446

INFO: Configuring axis binding for axis 1 0/32767 committed = false

INFO: AXIS 0 nValue -780 nCurrentDistance 6501 nFarthestDistance 6501

INFO: AXIS 0 nValue 0 nCurrentDistance 7281 nFarthestDistance 7281

INFO: AXIS 1 nValue 0 nCurrentDistance 321 nFarthestDistance 32446

INFO: Configuring axis binding for axis 1 0/32767 committed = true

INFO: BUTTON 10

INFO: Configuring button binding for button 10

INFO: AXIS 0 nValue 2248 nCurrentDistance 9529 nFarthestDistance 9529

INFO: AXIS 0 nValue 4497 nCurrentDistance 11778 nFarthestDistance 11778

INFO: AXIS 0 nValue 7067 nCurrentDistance 14348 nFarthestDistance 14348

INFO: AXIS 0 nValue 9316 nCurrentDistance 16597 nFarthestDistance 16597

INFO: AXIS 0 nValue 5139 nCurrentDistance 12420 nFarthestDistance 16597

INFO: AXIS 0 nValue 3212 nCurrentDistance 10493 nFarthestDistance 16597

INFO: AXIS 0 nValue 2569 nCurrentDistance 9850 nFarthestDistance 16597

INFO: AXIS 0 nValue 1284 nCurrentDistance 8565 nFarthestDistance 16597

INFO: AXIS 0 nValue 642 nCurrentDistance 7923 nFarthestDistance 16597

INFO: AXIS 0 nValue 0 nCurrentDistance 7281 nFarthestDistance 16597

INFO: AXIS 2 nValue -7740 nCurrentDistance 0 nFarthestDistance 0

INFO: AXIS 2 nValue -9030 nCurrentDistance 1290 nFarthestDistance 1290

INFO: AXIS 2 nValue -21415 nCurrentDistance 13675 nFarthestDistance 13675

INFO: AXIS 2 nValue -30703 nCurrentDistance 22963 nFarthestDistance 22963

INFO: Configuring axis binding for axis 2 0/-32768 committed = false

INFO: AXIS 2 nValue -31477 nCurrentDistance 23737 nFarthestDistance 23737

INFO: Configuring axis binding for axis 2 0/-32768 committed = false

INFO: AXIS 2 nValue -32768 nCurrentDistance 25028 nFarthestDistance 25028

INFO: Configuring axis binding for axis 2 0/-32768 committed = false

INFO: AXIS 3 nValue 767 nCurrentDistance 0 nFarthestDistance 0

INFO: AXIS 3 nValue 1279 nCurrentDistance 512 nFarthestDistance 512

INFO: AXIS 3 nValue 2047 nCurrentDistance 1280 nFarthestDistance 1280

INFO: AXIS 2 nValue 255 nCurrentDistance 7995 nFarthestDistance 25028

INFO: Configuring axis binding for axis 2 0/-32768 committed = true

INFO: AXIS 3 nValue 1023 nCurrentDistance 256 nFarthestDistance 1280

INFO: AXIS 3 nValue 255 nCurrentDistance 512 nFarthestDistance 1280

INFO: AXIS 2 nValue 9983 nCurrentDistance 17723 nFarthestDistance 17723

INFO: AXIS 2 nValue 20479 nCurrentDistance 28219 nFarthestDistance 28219

INFO: Configuring axis binding for axis 2 0/32767 committed = false

INFO: AXIS 2 nValue 21759 nCurrentDistance 29499 nFarthestDistance 29499

INFO: Configuring axis binding for axis 2 0/32767 committed = false

INFO: AXIS 2 nValue 31743 nCurrentDistance 39483 nFarthestDistance 39483

INFO: Configuring axis binding for axis 2 0/32767 committed = false

INFO: AXIS 2 nValue 32767 nCurrentDistance 40507 nFarthestDistance 40507

INFO: Configuring axis binding for axis 2 0/32767 committed = false

INFO: AXIS 3 nValue 1023 nCurrentDistance 256 nFarthestDistance 256

INFO: AXIS 2 nValue 255 nCurrentDistance 7995 nFarthestDistance 40507

INFO: Configuring axis binding for axis 2 0/32767 committed = true

INFO: AXIS 3 nValue 255 nCurrentDistance 512 nFarthestDistance 512

INFO: AXIS 3 nValue -8772 nCurrentDistance 9539 nFarthestDistance 9539

INFO: AXIS 3 nValue -28123 nCurrentDistance 28890 nFarthestDistance 28890

INFO: Configuring axis binding for axis 3 0/-32768 committed = false

INFO: AXIS 3 nValue -28897 nCurrentDistance 29664 nFarthestDistance 29664

INFO: Configuring axis binding for axis 3 0/-32768 committed = false

INFO: AXIS 3 nValue -29671 nCurrentDistance 30438 nFarthestDistance 30438

INFO: Configuring axis binding for axis 3 0/-32768 committed = false

INFO: AXIS 3 nValue -30703 nCurrentDistance 31470 nFarthestDistance 31470

INFO: Configuring axis binding for axis 3 0/-32768 committed = false

INFO: AXIS 2 nValue -2322 nCurrentDistance 5418 nFarthestDistance 5418

INFO: AXIS 3 nValue -32768 nCurrentDistance 33535 nFarthestDistance 33535

INFO: Configuring axis binding for axis 3 0/-32768 committed = false

INFO: AXIS 2 nValue -3354 nCurrentDistance 4386 nFarthestDistance 5418

INFO: AXIS 2 nValue -4128 nCurrentDistance 3612 nFarthestDistance 5418

INFO: AXIS 2 nValue -4902 nCurrentDistance 2838 nFarthestDistance 5418

INFO: AXIS 3 nValue -31735 nCurrentDistance 32502 nFarthestDistance 33535

INFO: Configuring axis binding for axis 3 0/-32768 committed = false

INFO: AXIS 3 nValue -20641 nCurrentDistance 21408 nFarthestDistance 33535

INFO: Configuring axis binding for axis 3 0/-32768 committed = false

INFO: AXIS 2 nValue -3612 nCurrentDistance 4128 nFarthestDistance 5418

INFO: AXIS 3 nValue -16771 nCurrentDistance 17538 nFarthestDistance 33535

INFO: Configuring axis binding for axis 3 0/-32768 committed = false

INFO: AXIS 2 nValue -258 nCurrentDistance 7482 nFarthestDistance 7482

INFO: AXIS 3 nValue 255 nCurrentDistance 512 nFarthestDistance 33535

INFO: Configuring axis binding for axis 3 0/-32768 committed = true

INFO: AXIS 2 nValue 255 nCurrentDistance 7995 nFarthestDistance 7995

INFO: AXIS 3 nValue 8191 nCurrentDistance 7424 nFarthestDistance 7424

INFO: AXIS 3 nValue 22527 nCurrentDistance 21760 nFarthestDistance 21760

INFO: Configuring axis binding for axis 3 0/32767 committed = false

INFO: AXIS 3 nValue 32767 nCurrentDistance 32000 nFarthestDistance 32000

INFO: Configuring axis binding for axis 3 0/32767 committed = false

INFO: AXIS 3 nValue 22527 nCurrentDistance 21760 nFarthestDistance 32000

INFO: Configuring axis binding for axis 3 0/32767 committed = false

INFO: AXIS 3 nValue 255 nCurrentDistance 512 nFarthestDistance 32000

INFO: Configuring axis binding for axis 3 0/32767 committed = true

INFO: BUTTON 11
|
|
|
|
|
|
Re: Joystick/gamepad usable for os4
|
Posted on: 2020/10/20 22:32
#124
|
Just popping in
|
@Capehill, @jabirulo Both analog Sticks are working using an MAGIC-NS USB Adapter and a Xbox One S Bluetooth Controller. In AmigaInput the right Stick is show as Z-Axis / Z-Axis rotation: 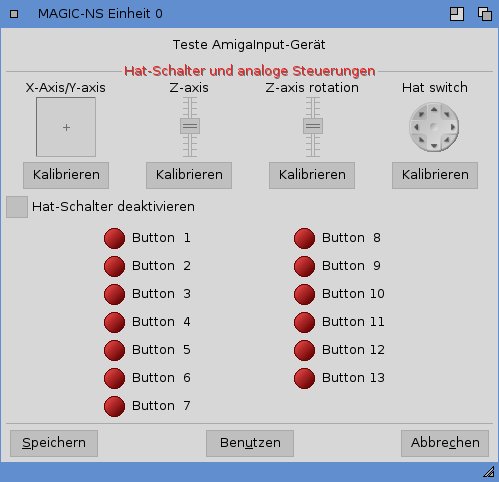 In Tower 57 the left stick moves the character while the right stick is used for aiming.
|
|
|
|
|
|
Re: SDL2 gamecontroller database Needs You!!
|
Posted on: 2020/10/7 19:15
#125
|
Just popping in
|
2 more
4c6f6769746563682052756d626c6550,Logitech RumblePad 2 USB,platform:AmigaOS 4,a:b1,b:b2,x:b0,y:b3,back:b8,start:b9,leftstick:b10,rightstick:b11,leftshoulder:b4,rightshoulder:b5,dpup:h0.1,dpdown:h0.4,dpleft:h0.8,dpright:h0.2,leftx:a0,lefty:a1,rightx:a2,righty:a3,lefttrigger:b6,righttrigger:b7,


4c6f6769746563682852292050726563,Logitech(R) Precision(TM) Gamepad,platform:AmigaOS 4,a:b1,b:b2,x:b0,y:b3,back:b8,start:b9,leftshoulder:b4,rightshoulder:b5,dpup:-a1,dpdown:+a1,dpleft:-a0,dpright:+a0,lefttrigger:b6,righttrigger:b7,
|
|
|
|
|
|
Re: SDL2 gamecontroller database Needs You!!
|
Posted on: 2020/9/30 13:45
#126
|
Just popping in
|
@jabirulo Thanks, will have a look at them later. I took care about proper Fullscreen Support. As by the source of the current Version (1.3.1) theres only this in code:
if (SDL_WM_ToggleFullScreen(screen)) { //this doesn't work on windows..

                    OSDset("toggle fullscreen");

                }
anyway i fixed, rather implemented it, including Tooltype Support. Exclusively for OS4  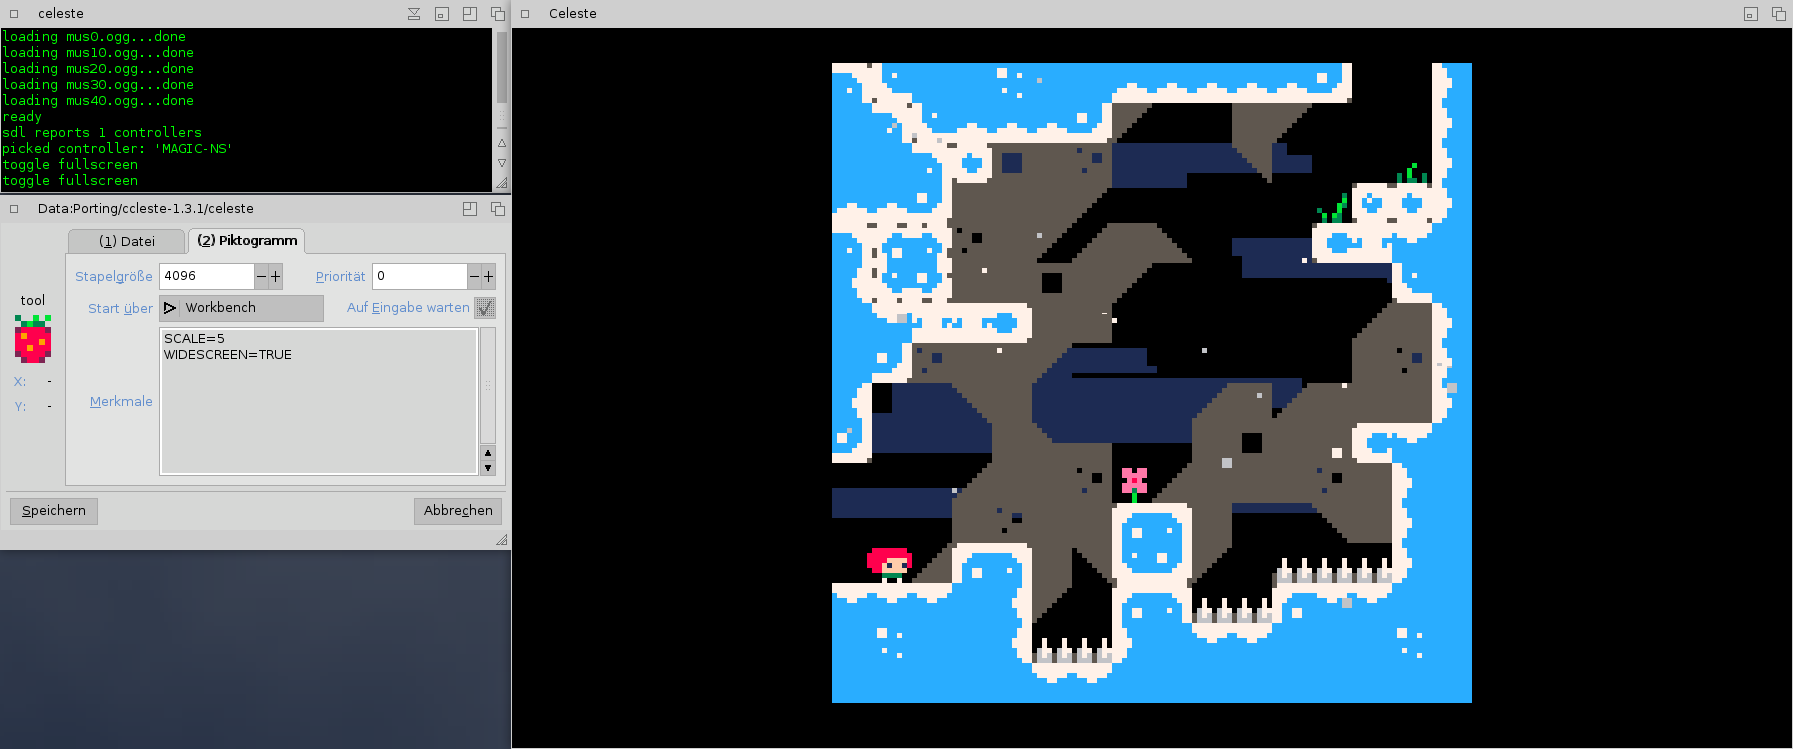
|
|
|
|
|
|
Re: SDL2 gamecontroller database Needs You!!
|
Posted on: 2020/9/29 23:43
#127
|
Just popping in
|
@jabirulo The release of such a great Game like Celeste cannot be postponed Since Controllers are working now i'll have a look at the fullscreen mode and maybe smt else. Will upload a new build soon. In the meantime i thought about that "gamecontrollerdb.txt" Database stuff. It's a bit annoying if you want to use an 'unregistered' Controller within various SDL2 based Games. The necessity to edit it per Game/GameDirectory could be avoided by moving it to ENV: so having the database globally available for related games using it. Maybe as a fallback and/or option to override the global one, the Game could still look inside current Directory for one.
|
|
|
|
|
|
Re: SDL2 gamecontroller database Needs You!!
|
Posted on: 2020/9/29 20:17
#128
|
Just popping in
|
@jabirulo Thank you for the code snippet you've pasted into the comments section of Celeste on OS4Depot. I was wondering why:
if (SDL_IsGameController(i)) {...
was failing even with my Controller already added some time ago to the gamecontrollerdb.txt. Anyway i executed "testgamecontroller" again and got a slightly different result than the one i've pasted earlier into this thread.
4d414749432d4e530000000000000000,MAGIC-NS,platform:AmigaOS 4,a:b2,b:b1,x:b3,y:b0,back:b8,guide:b12,start:b9,leftstick:b10,rightstick:b11,leftshoulder:b4,rightshoulder:b5,dpup:h0.1,dpdown:h0.4,dpleft:h0.8,dpright:h0.2,leftx:a0,lefty:a1,rightx:a2,righty:a3,lefttrigger:b6,righttrigger:b7,
With the newly created mapping the controller works now as expected.
|
|
|
|
|
|
Re: Trying to find X5000 U-Boot File
|
Posted on: 2020/9/16 18:15
#129
|
Just popping in
|
Also for me... it seems close to impossible to get the updated X5000 UBoot Files.
I wrote already multiple E-Mails to AmigaKit (short ones, long ones, always polite) --> Never got any answer!
I read here or in some other Forum it would be best to simply give them a phone call. Did that. Was pleased to write an E-Mail... Called them again...
Can it be that complicated to put those files behind the AmiSphere Login, where i can access already manuals ect?
|
|
|
|
|
|
Re: pci-e/m.2 ssd on x5000?
|
Posted on: 2020/8/24 18:39
#130
|
Just popping in
|
@aclogic
Yes, as in X5000 Manual written, only 10 Lanes (P5020 and P5040) are used. Do you know why? Any further information about that design?
|
|
|
|
|
|
Re: Sam460ex Cooler
|
Posted on: 2020/7/14 16:26
#131
|
Just popping in
|
I cannot help you with ACUBE SYSTEMS ONLINE STORE. Write them an email and give them a couple of days to respond. I can't see any changes regarding supported RAM size in Uboot 2015.a changelog: http://www.acube-systems.biz/index.php?page=news&id=134Only: "removed 2 GB limit for USB sticks" but thats something different.
|
|
|
|
|
|
Re: Sam460ex Cooler
|
Posted on: 2020/7/14 15:19
#132
|
Just popping in
|
You did it! Congratulations :)
Probably someone before you re-glued the cooler. On some 460 Boards the cooler simply fall off when moving the case. The glueing pad doesn't look as the ones i've seen from Acube.
Anyway now enjoy your properly cooled Sam460ex and continue tuning it :) (Configure Kicklayout, add a hotkey to enable 460PPC L2 Cache, install latest U-Boot and try out the memory speedup options, ...)
|
|
|
|
|
|
Re: Sam460ex Cooler
|
Posted on: 2020/7/5 23:51
#133
|
Just popping in
|
I had this active Cooler called "Red Baron" from "Marcus Computer Germany" on my Sam460ex. Meanwhile i sold the Sam and bought an X5000. So it's already some time ago when i installed it on to the CPU of the Sam460ex. But as far as i remember i performed the following steps to install it.
Don't perform the following steps if you feel uncomfortable with them. If so better ask someone for help. Don't blame me if something goes wrong as I will not take any warranty on the following instructions:
1 - Preparation:
- Bring the Sam460 Mainboard into a position where it is comfortable to do this maintenance work (on a desk)
- It is ok or even good to keep the Mainboard for this Task installed in the case
- Remove the Memory Module and the PCI-e/PCI Cards (This is just a security Step when you remove the passive Cooler)
- When you have the Mainboard in front of you the PCIe/PCI Slots should point to your Body and the external Connectors of the Mainboard (USB, Network) should point to the left
- Do some ESD preparations
2 - Removement of the old passive Cooler:
- Be careful!
- Left Hand Fingers: Place Thumb below CPU/Cooler and forefinger above CPU/Cooler directly on the Sam460 Mainboard - No force here!
- Right Hand Fingers: Grab with the Fingers of your choice the old Cooler and pull it. You maybe need to use some slight force to get it removed. Try to balance this force a bit out with the Left Hand (still on the Mainboard)
- The cooler will flake off jerkily (Because of this i recommended to remove Memory Module and PCIe/PCI Cards)
- Clean the CPU with a lintless cloth and a drip of pure Alcohol added to the cloth
3 - Installation of the "Red Baron":
- As before: You should have the Mainboard in front of you so the PCIe/PCI Slots should point to your Body and the external Connectors of the Mainboard (USB, Network) should point to the left
- "Red Baron" should be installed with its power cable showing into the opposite direction of the PCI Slots so Power cable away and not to the direction of the PCIe/PCI Slots
- Look BEFORE removing the foil from the gluing pad how to properly place the "Red Baron" onto your Mainboard. The cooler should cover the PPC CPU completely and sit straight on it
- Remove the foil from the gluing Pad of the "Red Baron" Cooler
- Place the "Red Baron" Cooler as described two steps earlier on the PPC CPU
- Add some light force on top of the cooler frame, the screws - NOT the propeller
- Connect the power cable from the "Red Baron" Cooler with the power supply
4 - Finalization:
- Reinstall the memory module and your PCI-e/PCI Cards
- Switch the machine on and see if it is booting and the propeller on the "Red Baron" Cooler is rotating
Good luck!
|
|
|
|
|
|
Re: How to enable DMA for SATA devices? - Sam460ex
|
Posted on: 2020/7/5 22:51
#134
|
Just popping in
|
Hi, you can't enable DMA on OS4 for the onboard SATA2 Port of the Sam460ex. ACube Systems never published a Device Driver with DMA Support for it. Because most of the people tend to use a SiI3114 SATA Controller and prefer to plug someting else into the PCI-Express X1 Slot which is mutually exclusive to that SATA2 Port. http://www.acube-systems.biz/index.php?page=hardware&pid=5
|
|
|
|
|
|
Re: Allegro5 for AmigaOS4.1
|
Posted on: 2020/6/12 20:30
#135
|
Just popping in
|
@samo79 Quote: In default window i have 40 FPS
While on smaller screen i reach 150 FPS In default window i have 210 FPS While on smaller screen i reach 830 FPS Anyway animations doesn't look and interaction doesn't feels like 210 FPS. This affects all Allegro Games. It's a bit better in Fullscreen. Do you still have an AmigaOS 4.1 Installation NOT Final Edition around to verify this problem exists or not on OS4.1 prior FE. I had a Sam440ep in the past and don't remember this "handbrake" behavior.
|
|
|
|
|
|
Re: Allegro5 for AmigaOS4.1
|
Posted on: 2020/6/12 20:21
#136
|
Just popping in
|
@samo79 Quote: Yeah, even on this little game CPU hit 100% usage
...
Interesting to note, CPU still always at 100% even if the game is paused Yes, simply everthing using Allegro Library causes 100% CPU Load, this is the problem we need to get rid of!
|
|
|
|
|
|
Re: SDL2 gamecontroller database Needs You!!
|
Posted on: 2020/6/12 18:56
#137
|
Just popping in
|
@jabirulo I perfomed the steps as written in README.NOW Contents of the MAPPING file: Quote: 4d414749432d4e530000000000000000,MAGIC-NS,platform:AmigaOS
4,a:b2,b:b1,x:b3,y:b0,back:b8,guide:b12,start:b9,leftstick:b10,rightstick:b11,leftshoulder:b4,rightshoulder:b5,dpup:h0.1,dpd
wn:h0.4,dpleft:h0.8,dpright:h0.2,leftx:a0,lefty:a1,rightx:a2,righty:a3,lefttrigger:b6,righttrigger:b7, However, step "4)Re-run testgamnecontroller" prints: Quote: INFO:
INFO: Joystick 0: MAGIC-NS (guid 4d414749432d4e530000000000000000, VID 0x0000, PID 0x0000, player index = -1)
INFO: There are 0 game controller(s) attached (1 joystick(s))
|
|
|
|
|
|
Re: Allegro5 for AmigaOS4.1
|
Posted on: 2020/6/12 17:52
#139
|
Just popping in
|
@samo79 Quote: 100% CPU on my Sam440 .. will try now with Paradroid Paranoid will probably show the same cpu load. Anyway it would be interesting how much FPS you get with default settings. When you have the FPS value for the default settings you can press the 'M' key 4 times on your keyboard to render the game only in a small frame. This FPS value would be interesting as well.
|
|
|
|
|